Friday, January 26, 2018

Fly Away with Me Tutorial


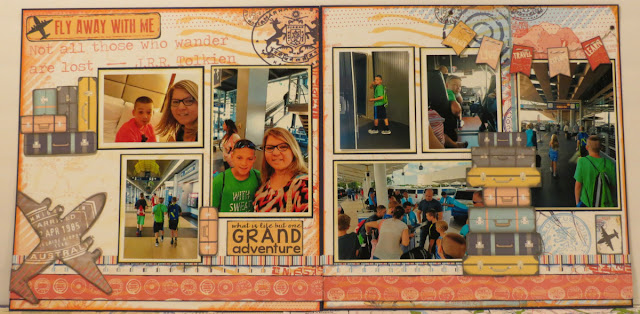
"Fly Away with Me"

Step by step tutorial:
 Photo mats for this layout are as follows:
1.       Photo Mats: (3)- 4x6 Navy Cardstock and (4)- 3 ¼ x 4 ¼ Navy cardstock. White mats are cut 1/8 of an inch smaller than Navy mats and inked with POW96 Vanilla Cream. 

Finished Layout

Instructions:
1.       Take QQP-FW101 (Airplane collage) paper and cut down to a 11 7/8 x 11 7/8 square. Ink the edges of the paper with POW98-Tropical Punch and POW101-Island Orange inks. Attach with adhesive to 12x12 Navy Cardstock. This will be the left side of the double page layout.
2. Take QQP-FW100 (Postage Collage) paper and trim down to a 11 7/8 x 11 7/8 square. Next, take this piece and place in the trimmer so that the postage image, that is pictured in the top right corner, is now located in the bottom left corner of the trimmer. Slide paper to 7 ½ inch mark and cut. Ink the edges of this piece on the top, bottom and right side only using the ink listed in step one.
3.       Now, glue this inked piece to the LEFT side of the second page of the navy 12x12. Take the remaining piece with the floral image and ink with the same ink in step one on the top bottom and RIGHT side only. Adhere this piece to the right side of navy cardstock butting it up to the edge of the 7 ½ piece already attached. 

4.       To assemble the borders for each page, take QQP-FW104 (multi-colored stripe) paper and cut (2)-1 ½ inch strips. Take second piece of QQP-FW101 (Airplane Collage) paper and fussy cut grey airplane image from the paper. From the same paper, cut (2)- 1” inch strips from the top of the paper (We will use the orange travel stamp side) and then (2) additional strips that measure ¾ of an inch wide (We will use the side that is mostly white) and add a decorative edge using something from your stash: scissors, border punch, etc. Ink these strips with POW97 Deep Sea on the decorative edge side.
5.       Adhere the ¾ decorative edge strip to the 1 ½ inch striped paper strip (roughly 3/8 of an inch from the top). Next, take the 1-inch orange travel stamp strip and ink with the ink used in step 4 and glue roughly 1/8 inch below decorative edge strip. Use this finished border as a guide to assemble second border. This will ensure borders line up and match. After both are assembled, glue them to each page about 3/8 of an inch from the bottom of page.

6.       Embellishment assembly: Cut title “Fly away with me” from QQP-FW500 ink edges with POW97 Deep Sea. Cut banner, “Grand Adventure” saying from QQP-FW600 and ink edges of banner with POW105 Cool Grey. Cut small airplane image away from Grand Adventure saying, to create two separate pieces. Ink the saying with POW97 Deep Sea and airplane with POW105 Cool Grey. Fussy cut the following suitcases from QQP-FW103: (6) individual suitcases for left side of page and (1) group of 7 suitcases left intact as a group for right side page. Ink all suitcase pieces with POW105 Cool Grey. Large airplane image cut earlier in step 4 is also inked with POW105 Cool Grey. 

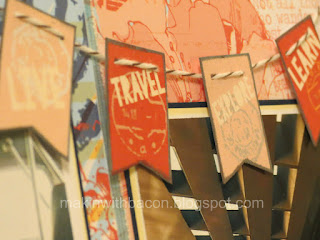
Banner 

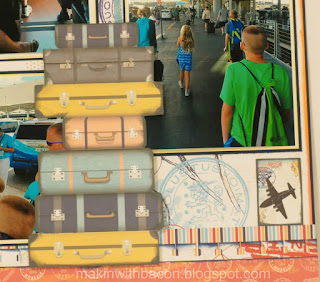
Suitcase group

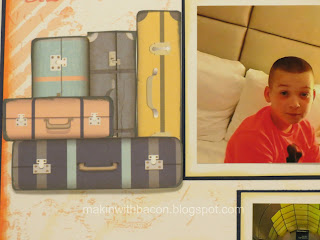
Suitcase individuals

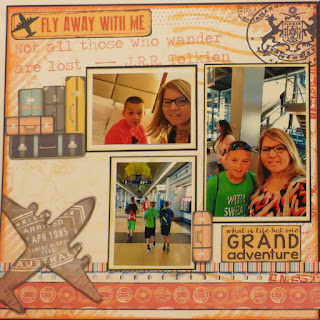
           Left side page assembly: Attach inked, fussy cut Airplane with foam adhesive and place over airplane image on the paper. Take one 4x6 photo mat and two 3 ¼ x 4 ¼ photo mat and attach to page as shown in the photo of page. Next, attach the saying “What is life but one Grand Adventure” underneath the 4x6 photo mat. Glue three suitcases vertically to the right side of the top smaller photo mat. Add foam tape or dots to one large suitcase and attach horizontally to the bottom of the suitcases and one small suitcase right above it. Take another suitcase with foam tape attach and adhere to the left of the Grand Adventure saying, overlapping the photo mat slightly. Lastly, adhere title, “Fly away with me” to the top left corner. 

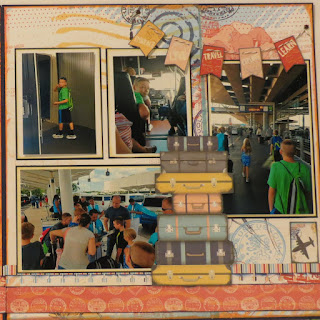
             Right side page assembly: place the remaining photo mats as shown in the photo of page. Add foam tape to the back of suitcase group and attach so that it overlaps the photo mats. Take the small airplane image that was separated from the saying and attach underneath horizontal photo mat. Take banner pieces and using 1/16-hole punch, punch two holes on the left and right side of banner at the top. String twine through holes and add a pop dot to the top of each banner piece. Place in the top right corner overlapping photo mats. When happy with position, remove backing from foam tape and attach, one at a time. Take piercing tool and poke hole through layout where you want the brads to attach. Insert the brad half way through paper and wrap twine around brad. Push all the way through and open prongs from behind. Repeat for second brad. Trim excess twine as desired and your page is complete!


Thanks for Makin' with Bacon! Have a crafty day!


Scrappin' Far and Away with Rebecca


Good day to everyone! Today I am sharing a layout I created with the Quick Quotes Paper line, Far and Away. It's a beautiful collection of corals, blues and yellows...perfect for whatever event you are scrapbooking today. 

"Fly Away with Me"

It is so easy to create your own embellishments with the Cardstock Paper Phrases! I just cut them apart punched holes in the top, added twine and foam dots and boom! Cute little banner made.

The paper itself can easily be cut apart and popped up with foam dots and inked for a simple, yet effective embellishment. Cut them individual or as a group...the choice is yours!

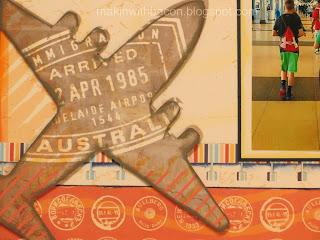
Once again, the paper provided the embellishment!  I fussy cut the airplane out of the paper just a tad bit smaller and overlaid it on top of the printed design.

Banner close up

These were cut individually with foam dots attached to the dark blue one.

Title Page-left side of the layout

Right side of the layout. You may not have noticed but the postage stamp design is originally in the top right corner of the paper. I wanted it in the center of the page and cut it accordingly. Then I glued it to the left side of the page enabling it to be positioned in the center and kissed the remaining piece on the right side of the page. How fun is that!?! Thanks for Makin' with Bacon!

Quick Quotes Products:

 PowderPuff Chalk Inks:  Tropical PunchIsland Orange, Cool Grey,
Deep SeaVanilla Cream


Antique Brads
Far and Away Paper Collection

Other products: 
Twine by Stampin Up!
Border punch by EK Sucess
Miscellaneous: trimmer, scissors, glue and foam dots

Saturday, January 20, 2018

Sneak Peak


My Design team box of goodies was delivered on Friday! Oh, it was filled with all sorts of good stuff! I am sharing a little sneak peek of the layout I finished late Friday night. I wasn't able to post pics of the mini album because I was having technical trouble in transferring the files. I will try again but not tonight as it's my 17th wedding anniversary and I need to get ready! Enjoy the sneak peeks and check out the Quick Quotes blog for more inspiration. The full layout will be posted January 26th. Have a crafty day!!


Wednesday, January 17, 2018

Bridal Shower Banner

I know I have been missing in action but it was not because I was slacking πŸ˜†In addition to setting up my video set up in my room; a close friend of mine has a daughter who will be getting married and needed help with a banner for the bridal shower. This is what I created for her..."Miss to Mrs"


There is just something about hand-crafted flowers that make me smile! 

I hope this inspires you to create your own bouquet of flowers. Tomorrow I will be sharing some shots of a mini album I created for a Christmas gift for my sister. My Quick Quotes design team box will be delivered on Friday and I am like a kid at Christmas!!!
Have a crafty day!!

Monday, January 8, 2018

Big Announcement!

I am so excited to announce I made the Design Team for 2018!! It's a dream come true πŸ’–

Here is the official announcement...http://www.blogquickquotes.com/

I'm so excited and thrilled to be a part of a company that is a foundation in the crafting world!

Today I am sharing a page I created and two Quick Quotes canvas art classes I have taken in the past.


A layout using Blue Fern, Heartfelt Creations and Tim Holtz

I love Quick Quotes! This was a class I had taken from them at The Novi, Michigan Mega Meet

When I worked on the road for Heartfelt Creations and traveled to the conventions; I always made sure to hit the Quick Quotes booth for a little merchandise to take home 😍

Thanks for visiting and soon, samples of Quick Quote products will flood the Blog! You will be "Makin with Bacon"!
Have a Blessed day!

Saturday, January 6, 2018

Armoire Tag Tutorial

As promised...here is the tutorial for the Armoire Tag...

A #10 tag size is usually 7 1/4 x 3 5/8 for this tag I had to make it a little larger. 


I cut a piece of chipboard to 8 1/2 x 4 1/8 (This way I could keep it for future reference on a key ring with several other sizes) I traced the image twice on kraft cardstock and cut the two pieces out with a paper trimmer. (Do not punch the hole in the top)

Using a Stampin Up! punch (Decorative Label), I punched the bottom of the tag in the center and only inserted the punch half way. This gave the look of dresser feet.

Next, with a ruler and pencil, I drew a rectangle 3/4 of an inch from the top that measured 3 x 4 7/16 

The length of the rectangle does not have to be 4 7/16 it could also be 4 3/8, whichever is easiest to achieve.

The dotted lines will be scored and the solid lines will be cut with an exacto knife and metal edge ruler. The cut will look like an "I"

After the opening was complete, I drew the dresser drawers at 3/4" x 3 1/2. No cutting here, just lines so I knew where I would put the drawers. 

Next, cut a 1" x 3" strip. Score at 1/2 inch and add scor-tape on both sides. Set aside.

Use your score board to score on the outside edges and erase any pencil lines if desired. Close the "doors" by adding painters tape to the back

I stamped with a background stamp I had in my stash that is retired from Stampin Up! Any wood grain stamp would work. The ink I used was Ground Expresso Distress Ink.

After stamping, I cut 2 strips out of Kraft cardstock that measured 4 x 1 1/8 and 2 more that measured 3 1/2 x 11/16th inches. These will be the layered panels on the opening doors. Another 2 strips that measure 3 1/2 x 3/4 inches for the dresser drawers. (These two pieces were hiding underneath the Armoire when I took the photo...Sorry!) I stamped them with the same background stamp. Using a Tim Holtz blending tool, I added Gathered Twigs and then Brushed Corduroy to the entire piece. I then took the Ground Expresso pad and dragged it from top to bottom in a direct to paper technique. Do the same to the dresser drawers and door panels, as well.

I inked all the edges of the door panels and drawers with black soot using a make up sponge for a more distinct look. I added two brads in the center of the drawers and added foam tape to the back of them. Attach them to the bottom of the opening. The larger door panel has foam tape added to the back and placed in the center of the each door. I glued the smaller piece with my ATG gun and adhered it to the center of the larger one.

I cut two pieces of mirrored cardstock for the inside panels of the door that measured 4 x 1 1/8. Attach with ATG or glue of your choice.

Remove the tape backing from one side of the hinge you created and set aside earlier and attach to the top of one of your tags. 

Remove the second piece and attach the second tag. (I used red tag so you could see how to attach.) You can cut a piece of decorative piece of paper to the inside piece that will be seen from the front when you open the doors. It serves a dual purpose because you can cover the inside hinge with the piece as well. 

There you have it...your own Armoire Tag! If you have any questions, let me know in the comments...I would love to see the one you create πŸ˜ƒ Have a crafty day!!

Friday, January 5, 2018

Armoire Tag


I wanted to join a swap using Julie Nutting dolls but I didn't own any. The host of the swap graciously offered to stamp and die cut a few to send to me so I could join. We also had to make an armoire tag to go along with it. I didn't own any of those either! I could have rushed order the pad from Julie Nutting but then I would have had to wait and been under pressure to get the swap done. Instead, I racked my brain and came up with my own! I hope you like it πŸ˜„  I did take pictures of it as I went so I will post a tutorial tomorrow because guess what? It was suppose to be Valentine colors! Back to the drawing board...πŸ˜‚


Wednesday, January 3, 2018

2017 Christmas Cards


Today I am sharing a class I taught at a LSS which I called "Dancing with Sugarplums".  The paper line was called Christmas Jewels and it was extremely popular! I loved the purple and silver and it was so much fun to design with non-traditional colors


These poinsettias were heat embossed with stampedous enamel on vellum and i think a spellbinder die sneaked into the design 😊


The next class I design for my LSS was titled Mint Wishes. Another non traditional color scheme I fell head over heels for...but can you blame me? LOL