Thursday, April 26, 2018

Card Inspiration with Secret Garden

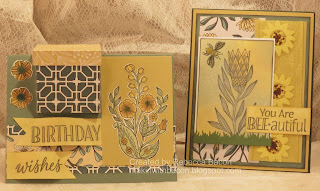
Hello, everyone! Secret Garden is such a great collection to create quick and easy cards. I am showcasing 3 cards today using this lush, rich in color, collection.


Left side card instructions:


  • Cut card base at 4 1/4 x 5 1/2 from white cardstock.
  • Cut 4 1/4 x 5 1/2 from 104 and ink edges. Attach to card base.
  • Die cut frame and a coordinating die for sentiment from 101, (I free hand cut leaves from scraps and added veins using a stylist.)
  • Die cut centerpiece from 104.
  • Glue centerpiece to inside frame, stamp sentiment on white and attach to die cut piece.
  • Add flowers, ribbon, butterflies and half-backed pearls.


Right side card instructions:

  • Cut card base from white cardstock at 4 1/4 x 5 1/2
  • Cut 4 1/4 x 5 1/2 from 101 and attach to card base.
  • Cut 4 1/8 x 5 1/4 mat from dark blue cardstock and attach to card base.
  • Die cut frame from 102 and attach to card.
  • Cut a strip from 103 and attach to center of card.
  • Die cut centerpiece from dark blue cardstock and third die cut from 101. Layer both pieces together and attach to card.
  • Die cut a flourish and flowers from scrap of 102.
  • Attach flowers, flourishes, sentiment and pearls as shown.


                                           The third card is called an impossible card. 


  • Measure the center of the top and sides of a 4 1/4 x 5 1/2 piece of 104 (white was used for demonstration purposes)
  • Draw line with pencil from side to side (2 1/8)
  • Draw line from 2 3/4 center to line in the middle of card.
  • Measure each side 1 inch from both sides. Draw line to center line. 


  • Cut on lines to center as shown


  • Take one side of 2 3/4 piece and twist it from the center point to line up to the edge.
  • Repeat step for the second 2 3/4 piece


  • Your piece should look like the above photo.
  • You can mat and decorate as you wish.


Thanks for stopping by the blog today!


QuickQuotes Products Used:

Secret Garden...coming soon
Cardstock Paper Phrases
PowderPuff Chalk Ink: LipstickRoyal Blue


Other products Used:
Card Creator dies by Spellbinders
Premade flowers by Petaloo
Punch flowers by EK Success
Flourish by Cheery Lynn


Tuesday, April 17, 2018

Beautiful Blooms with Secret Garden

Good day to everyone! It's Rebecca hosting today's blog post. The latest Quick Quotes collection, Secret Garden, is absolutely gorgeous! Rich hues of  red, yellow, blues and greens makes it a must have for any papercrafter! The inspiration for this layout was my nephew, Chase.


                                                             "Circle of Life"


****************************

I've seen this young man grow from a chubby baby to a man who will be married this October. It was fitting to use the saying from the Lion King for the title of this layout.

****************************

I began with (2)-12 x 12 white base pages and (2)-11 3/4 x 11 3/4 sheets of QQP-SG100 from Spring Showers

I wanted to show as many designs of Secret Garden as I could so I cut circles cut with a cricut machine, metal dies and punches and matted them with dark blue cardstock. 

I then cut a strip of paper 3 3/4 x 10 3/4 from the blue arrow paper and a 6 1/2 by 9 inch piece from the dark blue geometric patterned paper. I inked the edges of these pieces with Royal Blue PowderPuff ink.


*************************


I used a punch to remove the "Cherish" saying from the Paper Phrases sheet as well as the circle phrases. I also die cut flourishes from the celery color paper in the collection.


***************************


I used scissors to cut out the banners and inked the edges.


I fussy cut the flower from the beautiful blooms on sheet QQP-GN105 and added ink and Nuvo drops for added dimension. 

*****************************


I then assembled the right side of the page beginning with the large banner. The circles that were over the edge of the page were trimmed and used on the right side of the layout.


Little flowers were colored and used on the "Cherish" sentiment. 

Thanks for stopping by the blog!


Quick Quotes Products used:
Secret Garden...coming soon
PowderPuff Chalk Inks: Royal BlueLipstick Light Moss

Other Products Used:
white and dark blue cardstock
circles-punches, cricut machine and dies


Wednesday, April 11, 2018

Upcoming Card Class

Join me for a card class at The Stamp Shop in Shipshewana, Indiana.


April 30, 2018 10:00 am to 12:00 pm

Friday, April 6, 2018

Friday Challenge 86

Friday Challenge 86

It is the first Friday of April and you know what that means...  it is time to reveal the April challenge theme!

Be sure to stop back at the blog soon for the Challenge Winner Announcements for Friday Challenge 85 - " Travel and Adventure"!

*****

Hello, Quick Quotes fans! It's Rebecca hosting the April challenge. This month our theme is...

Include a Fold!
**********************

My first example is a layout where I chose to fold the paper to create a pleated frame on the left side of the layout. Next, I used a fold to create 4 pockets on the right side of the layout.  I repeated the pleated fold technique that I used on the right side of the layout. This time I used the strips of pleated paper on top of my pockets.


"Stella"


To create the large pleated frame:


  • Cut a 3.5 x 12 inch strip of patterned paper
  • Score @ 7/8", 1 1/8", 2", 2 1/4", and 3"
  • Flip the strip over (to work from the back) and fold the first score mark starting with mountain fold, then valley fold, mountain fold, valley fold and finally mountain.
  • Use aggressive adhesive to hold pleats in place.
  • Lay them on all 4 sides and miter corners


The pockets serve as a spot for hidden journaling!

I repeated the same technique but this time only wanted a mini pleat for the tops and bottoms of my pockets.

  • Cut strip of paper 2 1/4 x 12
  • Score at 1/2",3/4",1 1/4", 1 3/4" and 2"
  • Repeat mountain, valley, mountain folds 
  • Adhere to pockets and trim off edges...miter corners


I did a double pleat for my sides of the pockets. (Same technique as pictured above)

  • Cut strip of paper 1 1/2 x 12
  • Score at 1/2", 3/4" and 1 1/4"
  • Repeat mountain, valley fold
  • Lay on the pocket and trim off excess. Miter the corners.


I used the leftover mitered corner pieces for the corners of the second page of the layout.


I did a box pleat for the center of page 2


To create the pockets...
  • Cut paper to 4 1/2 x 5
  • Score at 1/2" on both ends on the 4 1/2 inch side
  • Score at 1/2" on the 5 inch side...miter corners
  • Add tape to the flaps and adhere to the page


*****************************


This technique can be used for cards as well...


  •  Cut a piece of patterned paper at 10 x 5 3/8
  • Score at 1", 1.5",2.5",3", 4", 4.5", 5.5", 6", 7", 7.5", 8.5" and 9"


  • Using a ruler and pencil, mark the short side at 2 3/16 and 3 3/16
  • On long side, mark at 4 1/2 and 5 1/2
  • Use ruler to connect marks and using scissors or trimmer, cut on the mark you just made.
  • Start at one end and do the mountain, valley fold until you reach the middle.
  • Repeat above step on the other side.
  • Adhere with aggressive tape.


Pleating and folding paper is so much fun and adds a unique look to your layouts and cards! I hope I have inspired you to try this month's challenge. Can't wait to see your projects that include a fold! 


Quick Quotes Products used:
Spring Flowers...coming soon
PowderPuff Chalk Inks: Deep SeaCatus

Other Products used:
Flower punch-EK Success
Dies-Spellbinders
Bling Flourish-Want 2 Scrap
Grass die-Cheery Lynn
Glitter, Elements-Art Glitter