Welcome to the Danger Zone Blog Hop

Connie Can Crop is the beginning of this "danger" filled hop! You should have arrived from
Sue- https://foleysfriend.blogspot.com
but if not please start at the beginning.
This is a one day blog hop, but you have until Sunday at 10pm to finish hopping and leaving your love for all of these talented crafters.
We have an awesome sponsor for this hop!!
Miss Kate Cuttables

One lucky winner is going to win their choice of 3 files!!
What do you need to do to win? Easy... become a follower of each of the fabulous blogs in this hop and leave each of them a comment letting them know what you like best about their projects.
You will have until 10 pm Sunday to finish the hop and leave your comments on every blog to be eligible to win.
Winners will be announced on Wednesday 10/24/18 at Connie Can Crop.
Be sure to follow everyone and leave a comment along the way!

Let's get started!
 |
| Cut one piece of cardstock at 6 1/4 x 6 1/4 and one piece of patterned paper at 6 x 6 |
 |
| Cut 20 patterned paper at 1 3/4 x 1 3/4 and 20 pieces at 1 1/2 x 1 1/2 |
 |
| Take the "B" side of your chosen paper and using a ruler, measure at 3" and make a mark. Repeat on all four sides and use the ruler to connect the marks to form a plus sign. Set aside. |
 |
| Cut four pieces of cardstock at 2 x 12 Score at 2, 4, 6, 8, 10 on all four pieces |
 |
| Fold on score lines |
 |
| Add adhesive to four ends |
 |
| Attach adhesive end to the backside of your "B" side in the center of the pencil line. Repeat until all four are attached. Make sure the score line is flush to the cut edge. Add adhesive to the back and attach to the 6 1/4 x 6 1/4 cardstock piece. |
 |
| Add paper clips to keep thing contained and it helps with training the paper on the score lines. Next, cut two pieces of cardstock at 7/8 x 3 1/4 and punch two circle punches. |
 |
| Glue the strips to form a plus sign. Punch a hole in the center of one circle and glue to the center of the plus sign. Add a nesting circle punched out of patterned paper and repeat hole punch. |
 |
| Now, remove one paper clip and fold the paper away from you. Mat squares to each strip until all are complete. Decorate the center as desired. Please note: If you are running something up the edge make sure it is flush. My Pumpkin man needed surgery with an exacto knife to become flush with the edge... |
 |
| Take the Plus sign and place it under the first square of each strip. Use pencil to mark edge. Add glue up to the line and glue to the square. |
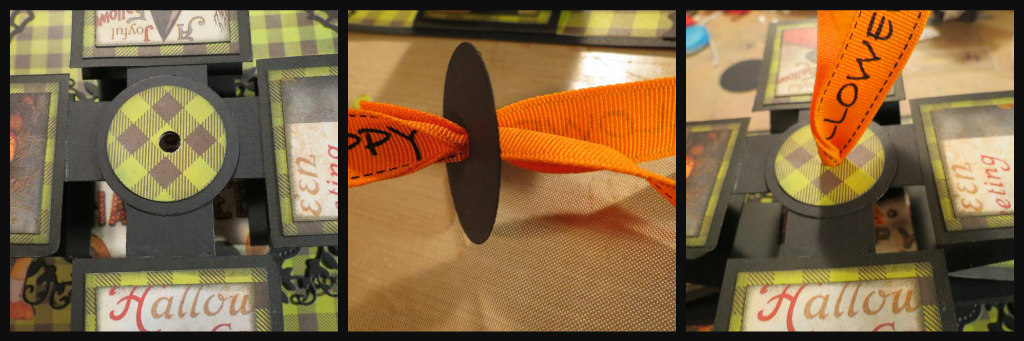 |
| Your card is now ready for ribbon. The ribbon will be going through the circle in the middle of your plus sign. The second photo in this set of three is merely for visual people. So pull the ribbon through the hole. |
 |
| Flip card over and using hot glue or foam tape secure ribbon down and attach second circle. No need for patterned paper here; I glued my plus sign up side down 😂 |
 |
| There you have it... a Halloween themed Pop up accordion card! |

You have reached the end of the Danger Zone Blog Hop!
Thanks for joining us for some Halloween inspiration.
Here's our line up in case you get lost along the way.
I am in awe! I have never seen this style if card before and it is so impressive! Thank you for the tutorial.
ReplyDeleteThis is fabulous! Thanks for adding all the steps, too! Great job!
ReplyDeleteGreat card and love the step by step.
ReplyDeleteamazing project! love how you gave a tutorial, I would have never known!
ReplyDeleteAlicia
Awesome pop up card! Thanks for the detailed tutorial. I think I will give this a try.
ReplyDeleteLoved the tutorial... I need to try this... Thank you!!
ReplyDeleteLove this! Thanks for showing us the steps.
ReplyDeleteThanks, everyone! Glad you liked the step by step :) they are really very easy!
ReplyDeleteWow girl!! Thanks for ending us with a bang! This is amazing. So happy you joined us. Thank you!
ReplyDeleteWhat a great end to the hop! I love your card!
ReplyDeleteI just love this. What is it called? I didn't see the name of the project and I want to try one. Is there a video on how to make it or could you do a video? I am a video tutorial type girl along with written directions. As you can see, I really want to make one. :)
ReplyDeleteThank you for the detailed instructions to create an accordion pop-up card. It's spook-tacular!
ReplyDeleteOh my!!! I love this!!!!!
ReplyDeleteLove it. Can't wait to try this one on my own! TFS
ReplyDeleteWow, so fun! I've never seen a card like this before. Cool!
ReplyDelete